
ZenML
STDIOOfficialMCP server for ZenML API integration, providing pipeline and ML workflow management
MCP server for ZenML API integration, providing pipeline and ML workflow management
This project implements a Model Context Protocol (MCP) server for interacting with the ZenML API.
The Model Context Protocol (MCP) is an open protocol that standardizes how applications provide context to Large Language Models (LLMs). It acts like a "USB-C port for AI applications" - providing a standardized way to connect AI models to different data sources and tools.
MCP follows a client-server architecture where:
ZenML is an open-source platform for building and managing ML and AI pipelines. It provides a unified interface for managing data, models, and experiments.
For more information, see the ZenML website and our documentation.
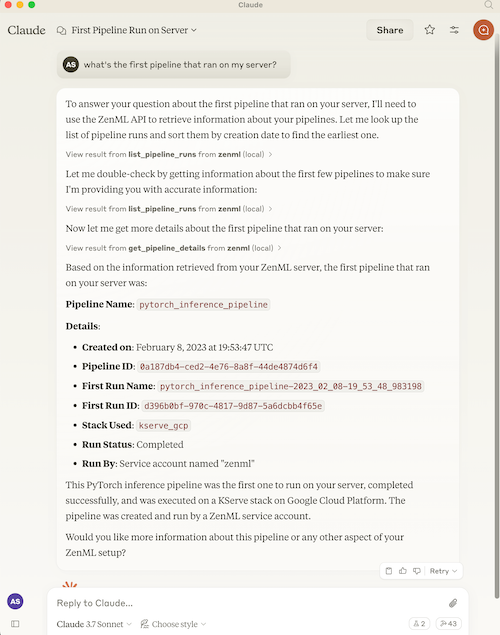
The server provides MCP tools to access core read functionality from the ZenML server, providing a way to get live information about:
It also allows you to trigger new pipeline runs (if a run template is present).
Note: This is a beta/experimental release. We're still exploring how people will use this integration, so we welcome your feedback and suggestions! Please join our Slack community to share your experience and help us improve.
This project includes automated testing to ensure the MCP server remains functional:
uv run scripts/test_mcp_server.py server/zenml_server.pyThe automated tests verify:
You will need to have access to a deployed ZenML server. If you don't have one, you can sign up for a free trial at ZenML Pro and we'll manage the deployment for you.
You will also (probably) need to have uv installed locally. For more information, see
the uv documentation.
We recommend installation via their installer script or via brew if using a
Mac. (Technically you don't need it, but it makes installation and setup easy.)
You will also need to clone this repository somewhere locally:
git clone https://github.com/zenml-io/mcp-zenml.git
The MCP config file is a JSON file that tells the MCP client how to connect to your MCP server. Different MCP clients will use or specify this differently. Two commonly-used MCP clients are Claude Desktop and Cursor, for which we provide installation instructions below.
You will need to specify your ZenML MCP server in the following format:
{
    "mcpServers": {
        "zenml": {
            "command": "/usr/local/bin/uv",
            "args": ["run", "path/to/server/zenml_server.py"],
            "env": {
                "LOGLEVEL": "WARNING",
                "NO_COLOR": "1",
                "ZENML_LOGGING_COLORS_DISABLED": "true",
                "ZENML_LOGGING_VERBOSITY": "WARN",
                "ZENML_ENABLE_RICH_TRACEBACK": "false",
                "PYTHONUNBUFFERED": "1",
                "PYTHONIOENCODING": "UTF-8",
                "ZENML_STORE_URL": "https://your-zenml-server-goes-here.com",
                "ZENML_STORE_API_KEY": "your-api-key-here"
            }
        }
    }
}
There are four dummy values that you will need to replace:
uv (the path listed above is where it
would be on a Mac if you installed it via brew)zenml_server.py file (this is the file that will be run when
you connect to the MCP server). This file is located inside this repository at
the root. You will need to specify the exact full path to this file.https://d534d987a-zenml.cloudinfra.zenml.io.You are free to change the way you run the MCP server Python file, but using
uv will probably be the easiest option since it handles the environment and
dependency installation for you.
You will need to have the latest version of Claude Desktop installed.
You can simply open the Settings menu and drag the mcp-zenml.mcpb file from the
root of this repository onto the menu and it will guide you through the
installation and setup process. You'll need to add your ZenML server URL and API key.
Note: MCP bundles (.mcpb) replace the older Desktop Extensions (.dxt) format; existing .dxt files still work in Claude Desktop.
For a better experience with ZenML tool results, you can configure Claude to display the JSON responses in a more readable format. In Claude Desktop, go to Settings → Profile, and in the "What personal preferences should Claude consider in responses?" section, add something like the following (or use these exact words!):
When using zenml tools which return JSON strings and you're asked a question, you might want to consider using markdown tables to summarize the results or make them easier to view!
This will encourage Claude to format ZenML tool outputs as markdown tables, making the information much easier to read and understand.
You will need to have Cursor installed.
Cursor works slightly differently to Claude Desktop in that you specify the config file on a per-repository basis. This means that if you want to use the ZenML MCP server in multiple repos, you will need to specify the config file in each of them.
To set it up for a single repository, you will need to:
.cursor folder in the root of your repositorymcp.json file with the content aboveIn our experience, sometimes it shows a red error indicator even though it is working. You can try it out by chatting in the Cursor chat window. It will let you know if is able to access the ZenML tools or not.
You can run the server as a Docker container. The process communicates over stdio, so it will wait for an MCP client connection. Pass your ZenML credentials via environment variables.
Pull the latest multi-arch image:
docker pull zenmldocker/mcp-zenml:latest
Versioned releases are tagged as vX.Y.Z:
docker pull zenmldocker/mcp-zenml:v1.0.0
Run with your ZenML credentials (stdio mode):
docker run -i --rm \
  -e ZENML_STORE_URL="https://your-zenml-server.example.com" \
  -e ZENML_STORE_API_KEY="your-api-key" \
  zenmldocker/mcp-zenml:latest
{
  "mcpServers": {
    "zenml": {
      "command": "docker",
      "args": [
        "run", "-i", "--rm",
        "-e", "ZENML_STORE_URL=https://...",
        "-e", "ZENML_STORE_API_KEY=ZENKEY_...",
        "-e", "ZENML_ACTIVE_PROJECT_ID=...",
        "-e", "LOGLEVEL=WARNING",
        "-e", "NO_COLOR=1",
        "-e", "ZENML_LOGGING_COLORS_DISABLED=true",
        "-e", "ZENML_LOGGING_VERBOSITY=WARN",
        "-e", "ZENML_ENABLE_RICH_TRACEBACK=false",
        "-e", "PYTHONUNBUFFERED=1",
        "-e", "PYTHONIOENCODING=UTF-8",
        "zenmldocker/mcp-zenml:latest"
      ]
    }
  }
}
From the repository root:
docker build -t zenmldocker/mcp-zenml:local .
Run the locally built image:
docker run -i --rm \
  -e ZENML_STORE_URL="https://your-zenml-server.example.com" \
  -e ZENML_STORE_API_KEY="your-api-key" \
  zenmldocker/mcp-zenml:local
This project uses MCP Bundles (.mcpb) — the successor to Anthropic's Desktop Extensions (DXT). MCP Bundles package an entire MCP server (including dependencies) into a single file with user-friendly configuration.
Note on rename: MCP Bundles replace the older .dxt format. Claude Desktop remains backward‑compatible with existing .dxt files, but we now ship mcp-zenml.mcpb and recommend using it going forward.
The mcp-zenml.mcpb file in the repository root contains everything needed to run the ZenML MCP server, eliminating the need for complex manual installation steps. This makes powerful ZenML integrations accessible to users without requiring technical setup expertise.
When you drag and drop the .mcpb file into Claude Desktop's settings, it automatically handles:
For more information, see Anthropic's announcement of Desktop Extensions (DXT) and related MCP bundle packaging guidance in their documentation: https://www.anthropic.com/engineering/desktop-extensions
This MCP server is published to the official Anthropic MCP Registry and is discoverable by compatible hosts. On each tagged release, our CI updates the registry entry via the registry’s mcp-publisher CLI using GitHub OIDC, so you can install or discover the ZenML MCP Server directly wherever the registry is supported (e.g., Claude Desktop’s Extensions catalog).
manifest.json and server.json..mcpb bundle (see above) or run the Docker image.Learn more about the registry here: