
Quickchat AI
STDIOOfficialMCP server for integrating Quickchat AI Agents with third-party AI applications
MCP server for integrating Quickchat AI Agents with third-party AI applications
The Quickchat AI MCP (Model Context Protocol) server allows you to let anyone plug in your Quickchat AI Agent into their favourite AI app such as Claude Desktop, Cursor, VS Code, Windsurf and more.
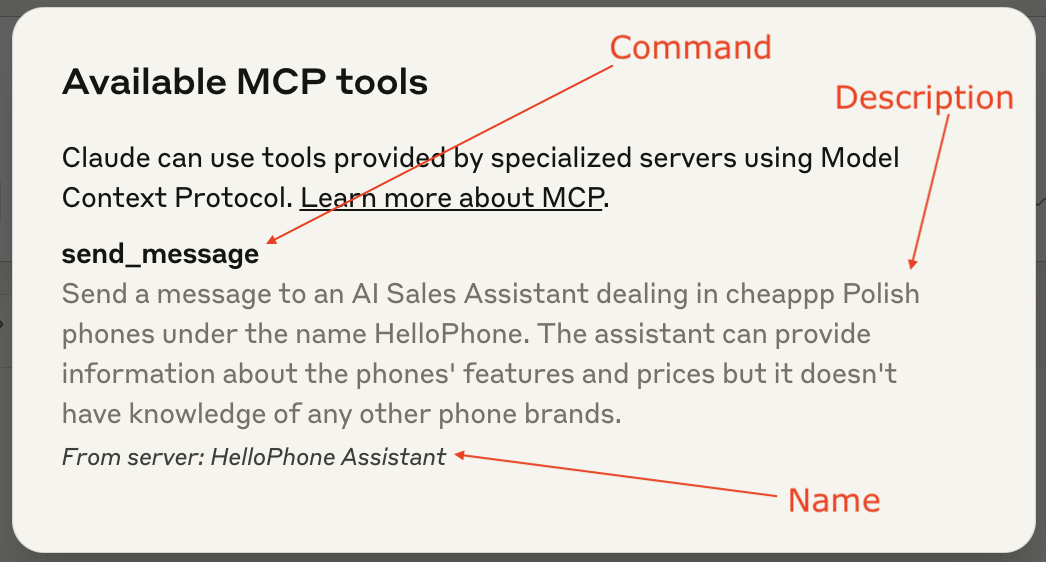
Claude tool anatomy
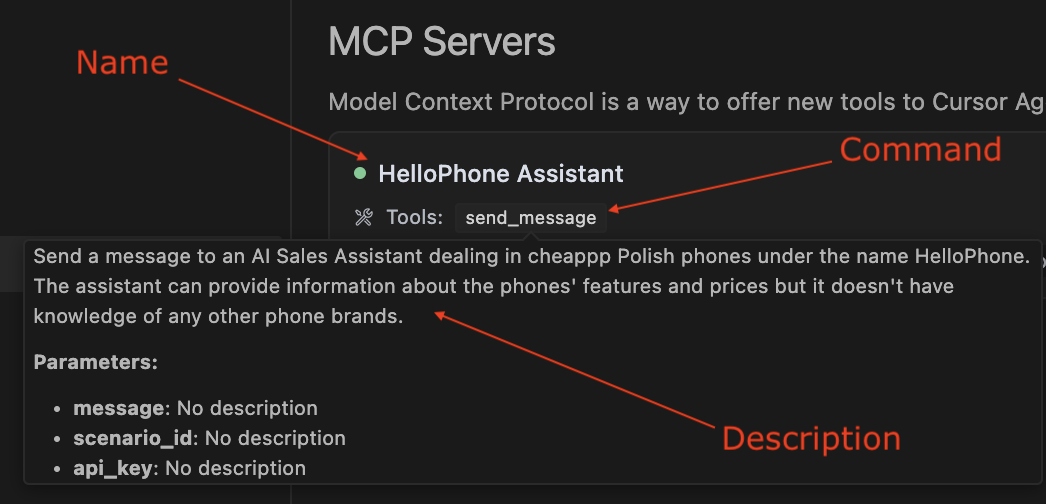
Cursor tool anatomy
Install uv using:
curl -LsSf https://astral.sh/uv/install.sh | sh
or read more here.
Go to Settings > Developer > Edit Config. Open the claude_desktop_config.json file in a text editor. If you're just starting out, the file is going to look like this:
{
  "mcpServers": {}
}
This is where you can define all the MCPs your Claude Desktop has access to. Here is how you add your Quickchat AI MCP:
{
  "mcpServers": {
    "< QUICKCHAT AI MCP NAME >": {
      "command": "uvx",
      "args": ["quickchat-ai-mcp"],
      "env": {
        "SCENARIO_ID": "< QUICKCHAT AI SCENARIO ID >",
        "API_KEY": "< QUICKCHAT AI API KEY >"
      }
    }
  }
}
Go to the Quickchat AI app > MCP > Integration to find the above snippet with the values of MCP Name, SCENARIO_ID and API_KEY filled out.
Go to Settings > Cursor Settings > MCP > Add new global MCP server and include the Quickchat AI MCP snippet:
{
  "mcpServers": {
    "< QUICKCHAT AI MCP NAME >": {
      "command": "uvx",
      "args": ["quickchat-ai-mcp"],
      "env": {
        "SCENARIO_ID": "< QUICKCHAT AI SCENARIO ID >",
        "API_KEY": "< QUICKCHAT AI API KEY >"
      }
    }
  }
}
As before, you can find values for MCP Name, SCENARIO_ID and API_KEY at Quickchat AI app > MCP > Integration.
Other AI apps will most likely require the same configuration but the actual steps to include it in the App itself will be different. We will be expanding this README as we go along.
⛔️ Do not publish your Quickchat API key to your users!
Once you're ready to let other users connect your Quickchat AI MCP to their AI apps, share configuration snippet with them! However, you need to make sure they can use your Quickchat AI MCP without your Quickchat API key. Here is how to do that:
{
  "mcpServers": {
    "< QUICKCHAT AI MCP NAME >": {
      "command": "uvx",
      "args": ["quickchat-ai-mcp"],
      "env": {
        "SCENARIO_ID": "< QUICKCHAT AI SCENARIO ID >"
      }
    }
  }
}
uv run mcp dev src/__main__.py
Use the following JSON configuration:
{
  "mcpServers": {
    "< QUICKCHAT AI MCP NAME >": {
      "command": "uv",
      "args": [
        "run",
        "--with",
        "mcp[cli]",
        "--with",
        "requests",
        "mcp",
        "run",
        "< YOUR PATH>/quickchat-ai-mcp/src/__main__.py"
      ],
      "env": {
        "SCENARIO_ID": "< QUICKCHAT AI SCENARIO ID >",
        "API_KEY": "< QUICKCHAT AI API KEY >"
      }
    }
  }
}
Make sure your code is properly formatted and all tests are passing:
ruff check --fix
ruff format
uv run pytest