
Penpot
STDIOMCP server enabling LLMs to interact with Penpot design projects via plugin API
MCP server enabling LLMs to interact with Penpot design projects via plugin API
This project enables LLMs to interact directly with Penpot design projects using the model context protocol (MCP), building on Penpot's plugin API to facilitate design data retrieval, modification, and creation.

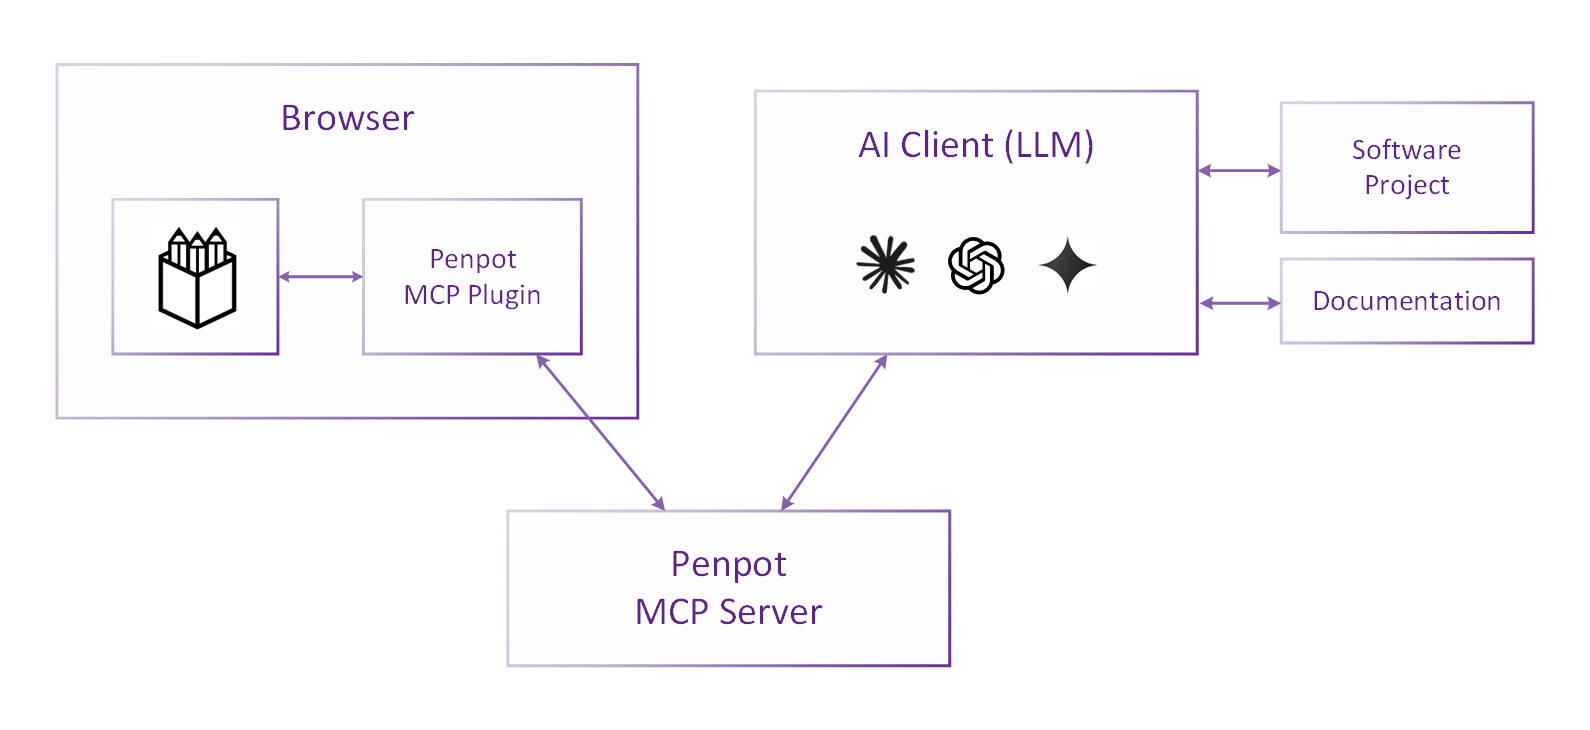
The Penpot MCP server exposes tools to AI clients (LLMs), which support the retrieval of design data as well as the modification and creation of design elements. The MCP server communicates with Penpot via a dedicated Penpot MCP plugin, which connects to the MCP server via WebSocket.
This repository is a monorepo containing four main components:
Common Types (common/):
Penpot MCP Server (mcp-server/):
Penpot MCP Plugin (penpot-plugin/):
Helper Scripts (python-scripts/):
The core components are written in TypeScript, rendering interactions with the Penpot Plugin API both natural and type-safe.
To use the Penpot MCP server, you must
Follow the steps below to enable the integration.
The project requires Node.js (tested with v22).
Following the installation of Node.js, the tools npm and npx should be
available in your terminal.
If it's your first execution, install the required dependencies:
npm install
Then build all components and start the two servers:
npm run bootstrap
This bootstrap command will:
npm run install:all)npm run build:all)npm run start:all)[!IMPORTANT] Browser Compatibility
Starting with Chromium version 142, Google has hardened the private network access (PNA) enforcement layer. This means that newer Chromium-based browsers (Chrome, Edge, Vivaldi, Opera, Brave, etc.) will not allow Penpot to connect to a local plugin server by default.To work around this, you can either
- use Firefox or
- use an older version of a Chromium-based browser (up to Chromium version 141).
We are working on a solution to this issue.
http://localhost:4400/manifest.json by default)[!IMPORTANT] Do not close the plugin's UI while using the MCP server, as this will close the connection.
By default, the server runs on port 4401 and provides:
http://localhost:4401/mcphttp://localhost:4401/sseThese endpoints can be used directly by MCP clients that support them. Simply configure the client to the MCP server by providing the respective URL.
When using a client that only supports stdio transport,
a proxy like mcp-remote is required.
The mcp-remote package can proxy stdio transport to HTTP/SSE,
allowing clients that support only stdio to connect to the MCP server indirectly.
Install mcp-remote globally if you haven't already:
npm install -g mcp-remote
Use mcp-remote to provide the launch command for your MCP client:
npx -y mcp-remote http://localhost:4401/sse --allow-http
For Windows and macOS, there is the official Claude Desktop app, which you can use as an MCP client. For Linux, there is an unofficial community version.
Since Claude Desktop natively supports only stdio transport, you will need to use a proxy like mcp-remote.
Install it as described above.
To add the server to Claude Desktop's configuration, locate the configuration file (or find it via Menu / File / Settings / Developer):
%APPDATA%/Claude/claude_desktop_config.json~/Library/Application Support/Claude/claude_desktop_config.json~/.config/Claude/claude_desktop_config.jsonAdd a penpot entry under mcpServers with the following content:
{
    "mcpServers": {
        "penpot": {
            "command": "npx",
            "args": ["-y", "mcp-remote", "http://localhost:4401/sse", "--allow-http"]
        }
    }
}
After updating the configuration file, restart Claude Desktop completely for the changes to take effect.
[!IMPORTANT] Be sure to fully quit the app for the changes to take effect; closing the window is not sufficient.
To fully terminate the app, choose Menu / File / Quit.
After the restart, you should see the MCP server listed when clicking on the "Search and tools" icon at the bottom of the prompt input area.
To add the Penpot MCP server to a Claude Code project, issue the command
claude mcp add penpot -t http http://localhost:4401/mcp