
ODBC
STDIOODBC database server for Model Context Protocol enabling LLM access to data sources.
ODBC database server for Model Context Protocol enabling LLM access to data sources.
This document covers the set up and use of a generic ODBC server for the Model Context Protocol (MCP), referred to as an mcp-odbc server. It has been developed to provide Large Language Models with transparent access to ODBC-accessible data sources via a Data Source Name configured for a specific ODBC Connector (also called an ODBC Driver).
This MCP Server for ODBC is a small TypeScript layer built on top of node-odbc. It routes calls to the host system's local ODBC Driver Manager via node.js (specifically using npx for TypeScript).
While the examples that follow are oriented toward the Virtuoso ODBC Connector, this guide will also work with other ODBC Connectors. We strongly encourage code contributions and submissions of usage demos related to other database management systems (DBMS) for incorporation into this project.
node.js version. If it's not 21.1.0 or higher, upgrade or install explicitly using:
nvm install v21.1.0
npm install @modelcontextprotocol/sdk zod tsx odbc dotenv
nvm version using:
nvm alias default 21.1.0
git clone https://github.com/OpenLinkSoftware/mcp-odbc-server.git
cd mcp-odbc-server
npm init -y
npm install @modelcontextprotocol/sdk zod tsx odbc dotenv
odbcinst -j
odbcinst -q -s
As good security practice, you should use the .env file situated in the same directory as the mcp-ser to set bindings for the ODBC Data Source Name (ODBC_DSN), the User (ODBC_USER), the Password (ODBC_PWD), the ODBC INI (ODBCINI), and, if you want to use the OpenLink AI Layer (OPAL) via ODBC, the target Large Language Model (LLM) API Key (API_KEY).
API_KEY=sk-xxx
ODBC_DSN=Local Virtuoso
ODBC_USER=dba
ODBC_PASSWORD=dba
ODBCINI=/Library/ODBC/odbc.ini
After successful installation, the following tools will be available to MCP client applications.
| name | description |
|---|---|
get_schemas | List database schemas accessible to connected database management system (DBMS). |
get_tables | List tables associated with a selected database schema. |
describe_table | Provide the description of a table associated with a designated database schema. This includes information about column names, data types, null handling, autoincrement, primary key, and foreign keys |
filter_table_names | List tables associated with a selected database schema, based on a substring pattern from the q input field. |
query_database | Execute a SQL query and return results in JSON Lines (JSONL) format. |
execute_query | Execute a SQL query and return results in JSON Lines (JSONL) format. |
execute_query_md | Execute a SQL query and return results in Markdown table format. |
spasql_query | Execute a SPASQL query and return results. |
sparql_query | Execute a SPARQL query and return results. |
virtuoso_support_ai | Interact with the Virtuoso Support Assistant/Agent — a Virtuoso-specific feature for interacting with LLMs |
get_schemas
user (string, optional): Database username. Defaults to "demo".password (string, optional): Database password. Defaults to "demo".dsn (string, optional): ODBC data source name. Defaults to "Local Virtuoso".get_tables
schema (string, optional): Database schema to filter tables. Defaults to connection default.user (string, optional): Database username. Defaults to "demo".password (string, optional): Database password. Defaults to "demo".dsn (string, optional): ODBC data source name. Defaults to "Local Virtuoso".TABLE_CAT, TABLE_SCHEM, TABLE_NAME, TABLE_TYPE).filter_table_names
q (string, required): The substring to search for within table names.schema (string, optional): Database schema to filter tables. Defaults to connection default.user (string, optional): Database username. Defaults to "demo".password (string, optional): Database password. Defaults to "demo".dsn (string, optional): ODBC data source name. Defaults to "Local Virtuoso".describe_table
schema (string, required): The database schema name containing the table.table (string, required): The name of the table to describe.user (string, optional): Database username. Defaults to "demo".password (string, optional): Database password. Defaults to "demo".dsn (string, optional): ODBC data source name. Defaults to "Local Virtuoso".COLUMN_NAME, TYPE_NAME, COLUMN_SIZE, IS_NULLABLE).query_database
query (string, required): The SQL query string to execute.user (string, optional): Database username. Defaults to "demo".password (string, optional): Database password. Defaults to "demo".dsn (string, optional): ODBC data source name. Defaults to "Local Virtuoso".query_database_md
query (string, required): The SQL query string to execute.user (string, optional): Database username. Defaults to "demo".password (string, optional): Database password. Defaults to "demo".dsn (string, optional): ODBC data source name. Defaults to "Local Virtuoso".query_database_jsonl
query (string, required): The SQL query string to execute.user (string, optional): Database username. Defaults to "demo".password (string, optional): Database password. Defaults to "demo".dsn (string, optional): ODBC data source name. Defaults to "Local Virtuoso".spasql_query
query (string, required): The SPASQL query string.max_rows (number, optional): Maximum number of rows to return. Defaults to 20.timeout (number, optional): Query timeout in milliseconds. Defaults to 30000, i.e., 30 seconds.user (string, optional): Database username. Defaults to "demo".password (string, optional): Database password. Defaults to "demo".dsn (string, optional): ODBC data source name. Defaults to "Local Virtuoso".Demo.demo.execute_spasql_query).sparql_query
query (string, required): The SPARQL query string.format (string, optional): Desired result format. Defaults to 'json'.timeout (number, optional): Query timeout in milliseconds. Defaults to 30000, i.e., 30 seconds.user (string, optional): Database username. Defaults to "demo".password (string, optional): Database password. Defaults to "demo".dsn (string, optional): ODBC data source name. Defaults to "Local Virtuoso"."UB".dba."sparqlQuery").virtuoso_support_ai
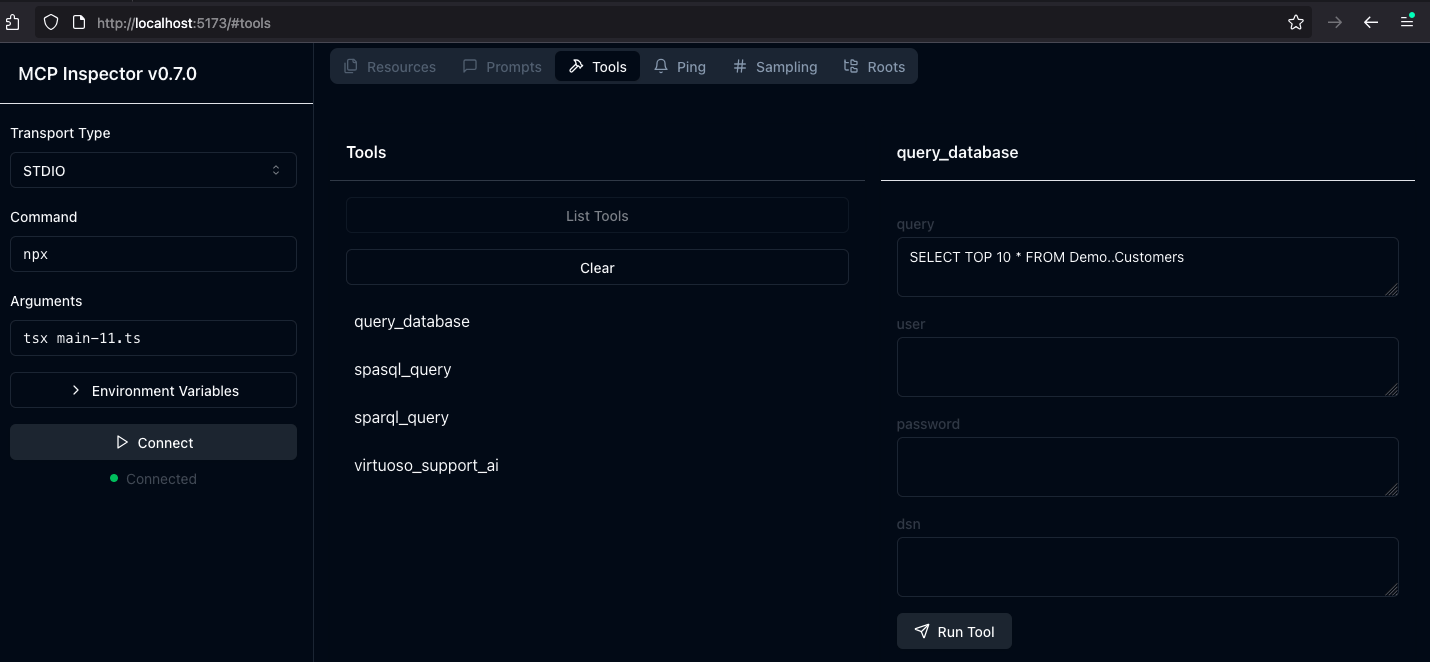
prompt (string, required): The prompt text for the AI function.api_key (string, optional): API key for the AI service. Defaults to "none".user (string, optional): Database username. Defaults to "demo".password (string, optional): Database password. Defaults to "demo".dsn (string, optional): ODBC data source name. Defaults to "Local Virtuoso".DEMO.DBA.OAI_VIRTUOSO_SUPPORT_AI).Start the inspector from the mcp-server directory/folder using the following command:
ODBCINI=/Library/ODBC/odbc.ini npx -y @modelcontextprotocol/inspector npx tsx ./src/main.ts
Click on the "Connect" button, then click on the "Tools" tab to get started.
This is a fork of the canonical edition that includes a JSON handling bug fix related to use with this MCP Server.
git clone [email protected]:OpenLinkSoftware/inspector.git
cd inspector
npm run start
Arguments input field of MCP Inspectors UI from http://localhost:6274
tsx /path/to/mcp-odbc-server/src/main.ts
Connect button to initialize your session with the designated MCP ServerThe x86_64 rather than arm64 edition of node may be in place, but the ODBC bridge and MCP server are arm64-based components.
You can solve this problem by performing the following steps:
node by running:
nvm uninstall 21.1.0
arch
arch arm64
node by running:
nvm install 21.1.0
When attempting to use a Model Context Protocol (MCP) ODBC Server on Apple Silicon machines, you may encounter architecture mismatch errors. These occur because the Node.js ODBC native module (odbc.node) is compiled for ARM64 architecture, but the x86_64-based edition of the unixODBC runtime is being loaded.
Typical error message:
Error: dlopen(...odbc.node, 0x0001): tried: '...odbc.node' (mach-o file, but is an incompatible architecture (have 'x86_64', need 'arm64e' or 'arm64'))
You solve this problem by performing the following steps:
Verify your Node.js is running in ARM64 mode:
node -p "process.arch" # Should output: `arm64`
Install unixODBC for ARM64:
# Verify Homebrew is running in ARM64 mode
which brew  # Should point to /opt/homebrew/bin/brew

# Remove existing unixODBC
brew uninstall --force unixodbc

# Install ARM64 version
arch -arm64 brew install unixodbc
Rebuild the Node.js ODBC module for ARM64:
# Navigate to your project
cd /path/to/mcp-odbc-server

# Remove existing module
rm -rf node_modules/odbc

# Set architecture environment variable
export npm_config_arch=arm64

# Reinstall with force build
npm install odbc --build-from-source
Verify the module is now ARM64:
file node_modules/odbc/lib/bindings/napi-v8/odbc.node
# Should show "arm64" instead of "x86_64"
Node.js ODBC module must be ARM64-compatibleexport npm_config_arch=arm64) is more reliable than npm config commandsfile command or node -p "process.arch"arch -arm64 to force use of ARM64 binariesThe path for this config file is: ~{username}/Library/Application Support/Claude/claude_desktop_config.json.
{
    "mcpServers": {
        "ODBC": {
            "command": "/path/to/.nvm/versions/node/v21.1.0/bin/node",
            "args": [
                "/path/to/mcp-odbc-server/node_modules/.bin/tsx",
                "/path/to/mcp-odbc-server/src/main.ts"
            ],
            "env": {
                "ODBCINI": "/Library/ODBC/odbc.ini",
                "NODE_VERSION": "v21.1.0",
                "PATH": "~/.nvm/versions/node/v21.1.0/bin:${PATH}"
            },
            "disabled": false,
            "autoApprove": []
        }
    }
}
Start the application.
Apply configuration (from above) via Settings | Developer user interface.
Ensure you have a working ODBC connection to a Data Source Name (DSN).
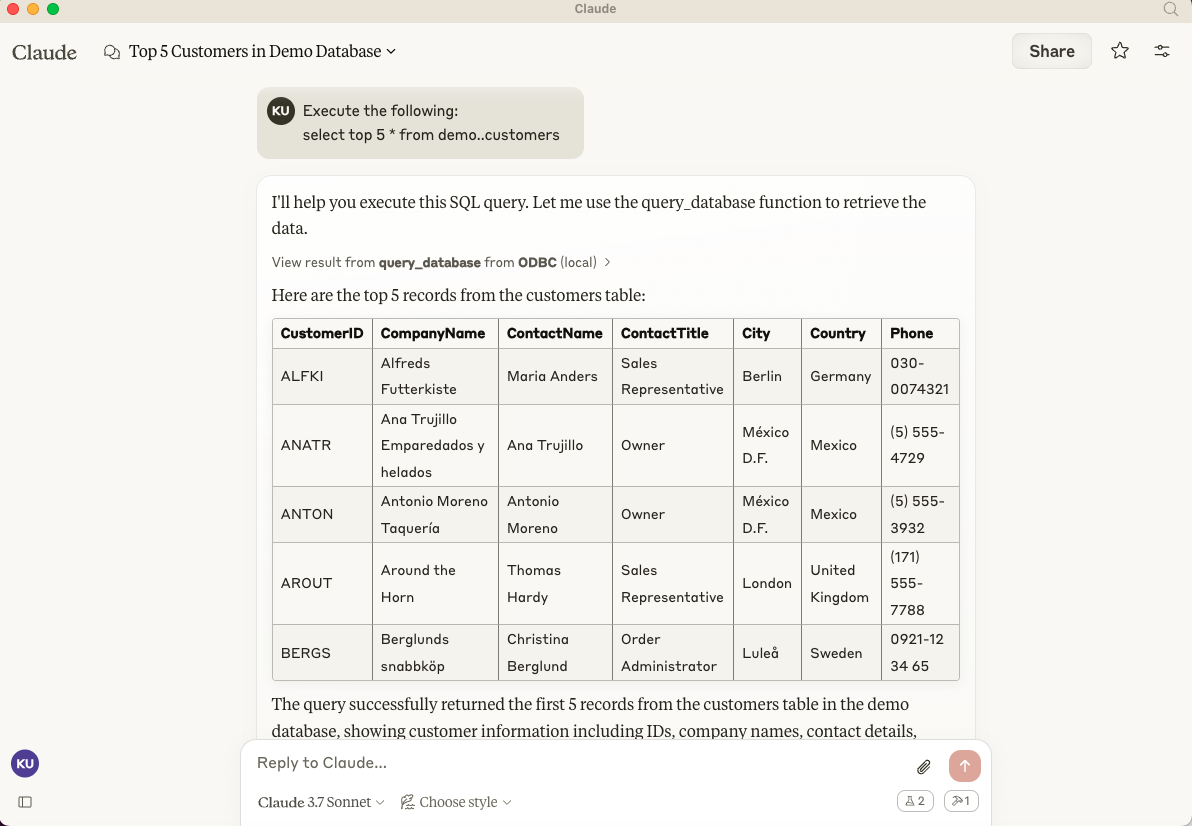
Present a prompt requesting query execution, e.g.,
Execute the following query: SELECT TOP * from Demo..Customers
The path for this config file is: ~{username}/Library/Application\ Support/Code/User/globalStorage/saoudrizwan.claude-dev/settings/cline_mcp_settings.json
{
  "mcpServers": {
    "ODBC": {
      "command": "/path/to/.nvm/versions/node/v21.1.0/bin/node",
      "args": [
        "/path/to/mcp-odbc-server/node_modules/.bin/tsx",
        "/path/to/mcp-odbc-server/src/main.ts"
      ],
      "env": {
        "ODBCINI": "/Library/ODBC/odbc.ini",
        "NODE_VERSION": "v21.1.0",
        "PATH": "/path/to/.nvm/versions/node/v21.1.0/bin:${PATH}"
      },
      "disabled": false,
      "autoApprove": []
    }
  }
}
Use Shift+Command+P to open the Command Palette.
Type in: Cline.
Select: Cline View, which opens the Cline UI in the VSCode sidebar.
Use the four-squares icon to access the UI for installing and configuring MCP servers.
Apply the Cline Config (from above).
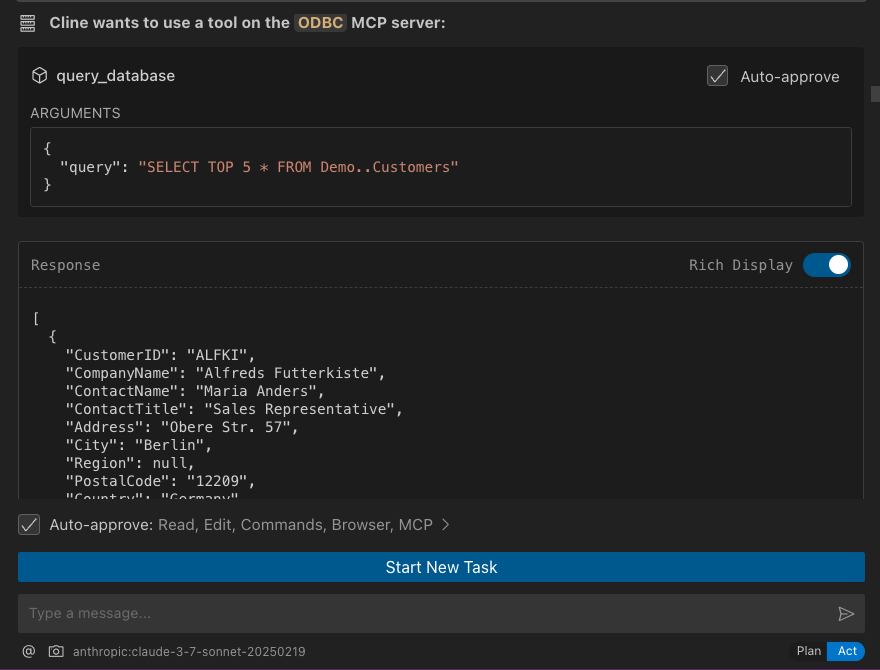
Return to the extension's main UI and start a new task requesting processing of the following prompt:
"Execute the following query: SELECT TOP 5 * from Demo..Customers"
Use the settings gear to open the configuration menu that includes the MCP menu item for registering and configuring mcp servers.
Use the Command+I or Control+I key combination to open the Chat Interface.
Select Agent from the drop-down at the bottom left of the UI, where the default is Ask.
Enter your prompt, qualifying the use of the mcp-server for odbc using the pattern: @odbc {rest-of-prompt}.
Click on "Accept" to execute the prompt.
