
Kestra Python
STDIODocker-based MCP server for Kestra workflow automation with AI integration
Docker-based MCP server for Kestra workflow automation with AI integration
You can run the MCP Server in a Docker container. This is useful if you want to avoid managing Python environments or dependencies on your local machine.
See kestra_mcp_docker.
Paste the following configuration into your MCP settings (e.g., Cursor, Claude, or VS Code):
{
  "mcpServers": {
    "kestra": {
      "command": "docker",
      "args": [
        "run",
        "-i",
        "--rm",
        "--pull",
        "always",
        "-e",
        "KESTRA_BASE_URL",
        "-e",
        "KESTRA_TENANT_ID",
        "-e",
        "KESTRA_MCP_DISABLED_TOOLS",
        "-e",
        "KESTRA_MCP_LOG_LEVEL",
        "-e",
        "KESTRA_USERNAME",
        "-e",
        "KESTRA_PASSWORD",
        "ghcr.io/kestra-io/mcp-server-python:latest"
      ],
      "env": {
        "KESTRA_BASE_URL": "http://host.docker.internal:8080/api/v1",
        "KESTRA_TENANT_ID": "main",
        "KESTRA_MCP_DISABLED_TOOLS": "ee",
        "KESTRA_MCP_LOG_LEVEL": "ERROR",
        "KESTRA_USERNAME": "[email protected]",
        "KESTRA_PASSWORD": "your_password"
      }
    }
  }
}
{
  "mcpServers": {
    "kestra": {
      "command": "docker",
      "args": [
        "run",
        "-i",
        "--rm",
        "--pull",
        "always",
        "-e", "KESTRA_BASE_URL",
        "-e", "KESTRA_API_TOKEN",
        "-e", "KESTRA_TENANT_ID",
        "-e", "KESTRA_MCP_LOG_LEVEL",
        "ghcr.io/kestra-io/mcp-server-python:latest"
      ],
      "env": {
        "KESTRA_BASE_URL": "http://host.docker.internal:8080/api/v1",
        "KESTRA_API_TOKEN": "<your_kestra_api_token>",
        "KESTRA_TENANT_ID": "main",
        "KESTRA_MCP_LOG_LEVEL": "ERROR"
      }
    }
  }
}
{
  "mcpServers": {
    "kestra": {
      "command": "docker",
      "args": [
        "run",
        "-i",
        "--rm",
        "--pull",
        "always",
        "-e", "KESTRA_BASE_URL",
        "-e", "KESTRA_API_TOKEN",
        "-e", "KESTRA_TENANT_ID",
        "-e", "KESTRA_USERNAME",
        "-e", "KESTRA_PASSWORD",
        "-e", "KESTRA_MCP_DISABLED_TOOLS",
        "-e", "KESTRA_MCP_LOG_LEVEL",
        "ghcr.io/kestra-io/mcp-server-python:latest"
      ],
      "env": {
        "KESTRA_BASE_URL": "http://host.docker.internal:8080/api/v1",
        "KESTRA_API_TOKEN": "<your_kestra_api_token>",
        "KESTRA_TENANT_ID": "main",
        "KESTRA_USERNAME": "admin",
        "KESTRA_PASSWORD": "admin",
        "KESTRA_MCP_DISABLED_TOOLS": "ee",
        "KESTRA_MCP_LOG_LEVEL": "ERROR"
      }
    }
  }
}
Notes:
<your_kestra_api_token>, <your_google_api_key>, and <your_helicone_api_key> with your actual credentials.KESTRA_USERNAME and KESTRA_PASSWORD instead of KESTRA_API_TOKEN.KESTRA_MCP_DISABLED_TOOLS=ee.host.docker.internal hostname allows the Docker container to access services running on your host machine (such as the Kestra API server on port 8080). This works on macOS and Windows. On Linux, you may need to use the host network mode or set up a custom bridge.-e flags pass environment variables from your MCP configuration into the Docker container.Note: The ee tool group contains Enterprise Edition specific functionality and is only available in EE/Cloud editions. For OSS users, you can disable EE tools by adding KESTRA_MCP_DISABLED_TOOLS=ee to your .env file.
Optionally, you can include KESTRA_MCP_DISABLED_TOOLS in your .env file listing the tools that you prefer to disable. For example, if you want to disable Namespace Files tools, add this to your .env file:
KESTRA_MCP_DISABLED_TOOLS=files
To disable multiple tools, separate them with comma:
KESTRA_MCP_DISABLED_TOOLS=ee
By default, the MCP server only logs ERROR level messages to minimize noise. You can control the logging level using the KESTRA_MCP_LOG_LEVEL environment variable:
# Only show ERROR messages (default)
KESTRA_MCP_LOG_LEVEL=ERROR

# Show WARNING and ERROR messages
KESTRA_MCP_LOG_LEVEL=WARNING

# Show INFO, WARNING, and ERROR messages
KESTRA_MCP_LOG_LEVEL=INFO

# Show all messages including DEBUG
KESTRA_MCP_LOG_LEVEL=DEBUG
When using Docker, add the environment variable to your MCP configuration:
{
  "mcpServers": {
    "kestra": {
      "command": "docker",
      "args": [
        "run",
        "-i",
        "--rm",
        "--pull",
        "always",
        "-e", "KESTRA_BASE_URL",
        "-e", "KESTRA_MCP_LOG_LEVEL",
        "ghcr.io/kestra-io/mcp-server-python:latest"
      ],
      "env": {
        "KESTRA_BASE_URL": "http://host.docker.internal:8080/api/v1",
        "KESTRA_MCP_LOG_LEVEL": "ERROR"
      }
    }
  }
}
To run the MCP Server for Kestra locally (e.g. if you want to extend it with new tools), make sure to create a virtual environment first:
uv venv --python 3.13
uv pip install -r requirements.txt
Create an .env file in the root directory of the project similar to the .env_example file. For OSS installations, you can use basic authentication with KESTRA_USERNAME and KESTRA_PASSWORD. For EE/Cloud installations, use KESTRA_API_TOKEN. To disable Enterprise Edition tools in OSS, add KESTRA_MCP_DISABLED_TOOLS=ee to your .env file.
Then, follow the instructions below explaining how to test your local server in Cursor, Windsurf, VS Code or Claude Desktop.
To use the Python MCP Server with Claude or modern IDEs, first check what is the path to uv on your machine:
which uv
Copy the path returned by which uv and paste it into the command section.
Then, replace the --directory by the path where you cloned the Kestra MCP Server repository. For example:
{
  "mcpServers": {
    "kestra": {
      "command": "/Users/annageller/.local/bin/uv",
      "args": [
        "--directory",
        "/Users/annageller/gh/mcp-server-python/src",
        "run",
        "server.py"
      ]
    }
  }
}
You can paste that in the Cursor MCP settings or Claud Developer settings.
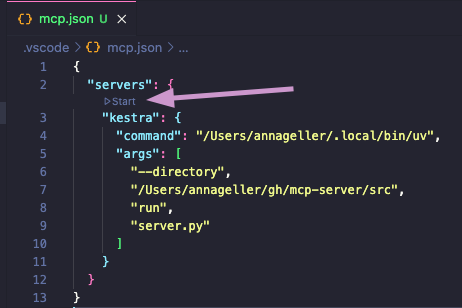
In your VS Code project directory, add a folder .vscode and within that folder, create a file called mcp.json. Paste your MCP configuration into that file (note that in VS Code, the key is servers instead of mcpServers):
{
  "servers": {
    "kestra": {
      "command": "/Users/annageller/.local/bin/uv",
      "args": [
        "--directory",
        "/Users/annageller/gh/mcp-server-python/src",
        "run",
        "server.py"
      ]
    }
  }
}
A small Start button should show up, click on it to start the server.
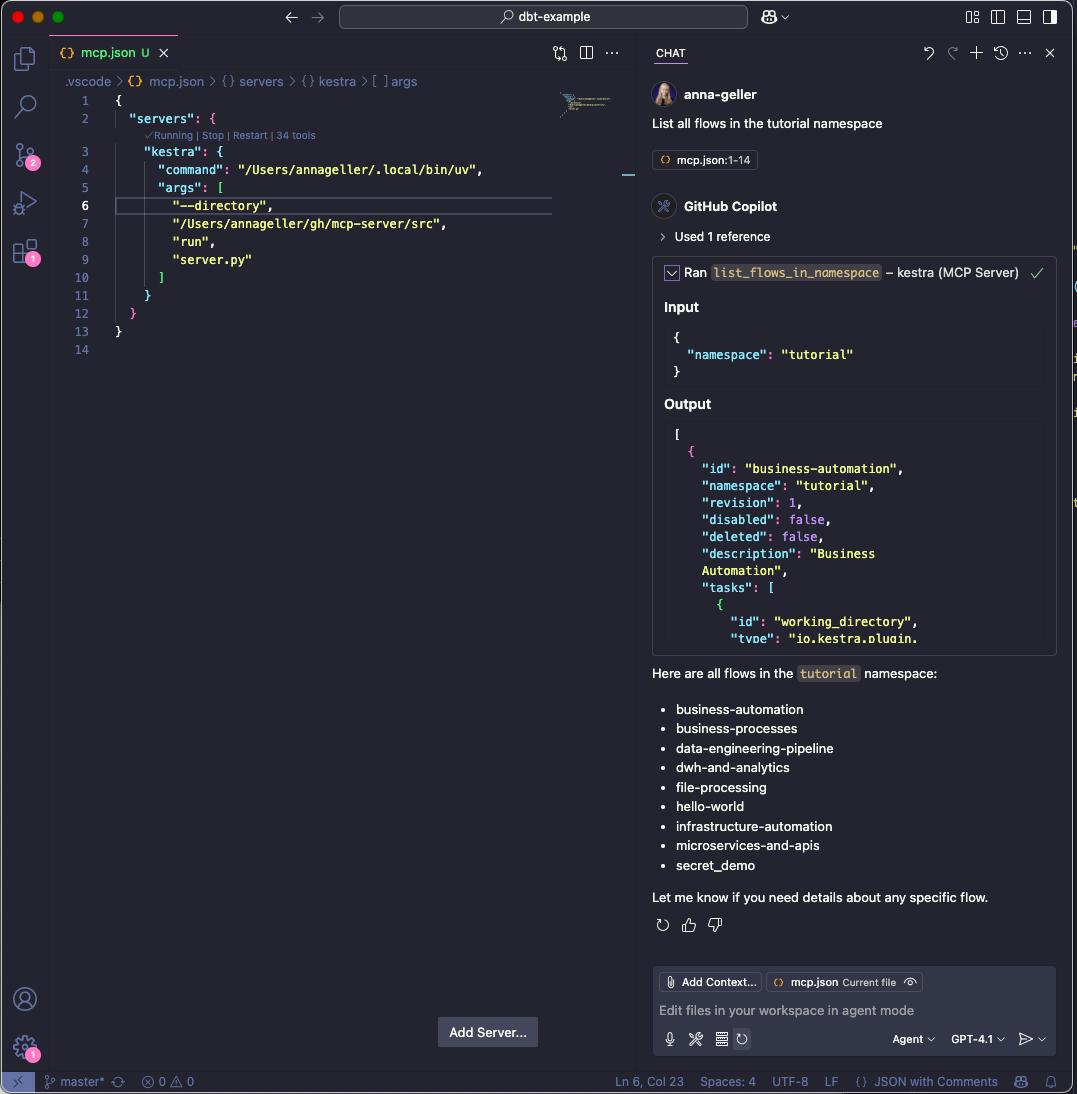
If you now navigate to the GitHub Copilot tab and switch to the Agent mode, you will be able to directly interact with the Kestra MCP Server tools. For example, try typing the prompt: "List all flows in the tutorial namespace".
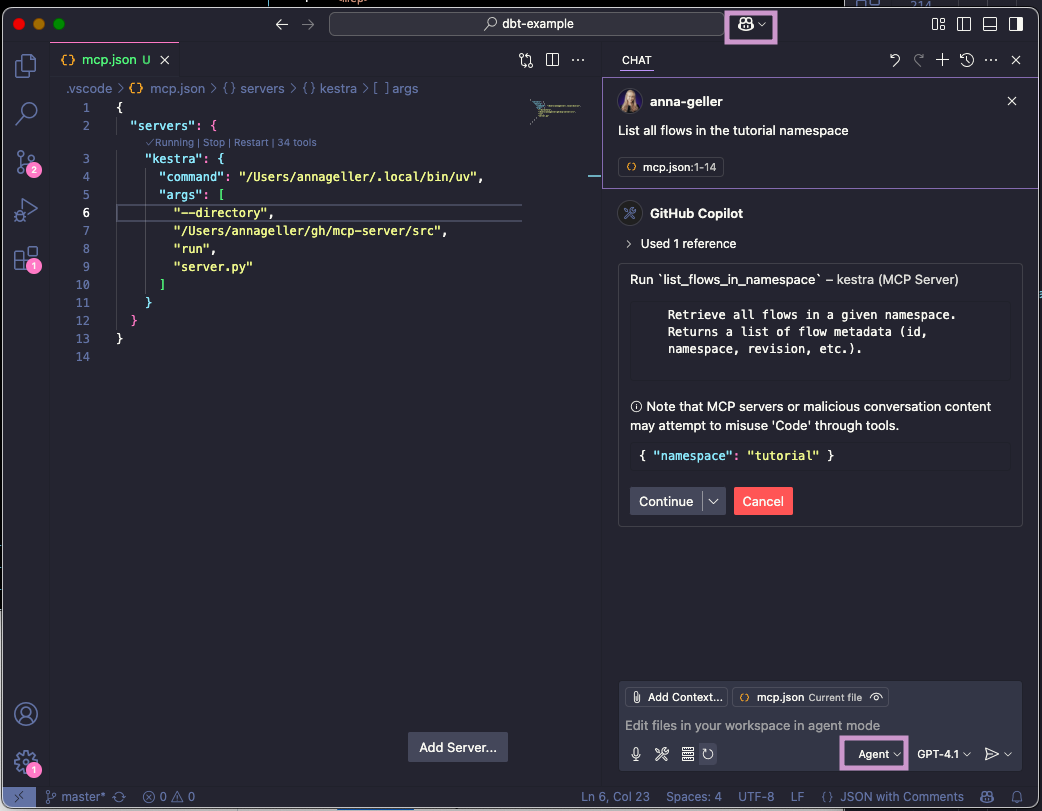
If you click on continue, you will see the result of the command in the output window.
Question: Do I have to manually start the server as an always-on process?
No, you don't have to run the server manually, as when using the stdio transport, the AI IDEs/chat-interfaces (Cursor, Windsurf, VS Code or Claude Desktop) launch the MCP server as a subprocess. This subprocess communicates with AI IDEs via JSON-RPC messages over standard input and output streams. The server receives messages through stdin and sends responses through stdout.
Question: Do I have to manually activate the virtual environment for the MCP Server?
No, because we use uv. Unlike traditional Python package managers, where virtual environment activation modifies shell variables like PATH, uv directly uses the Python interpreter and packages from the .venv directory without requiring environment variables to be set first. Just make sure you have created a uv virtual environment with uv venv and installed the required packages with uv pip install as described in the previous section.