
GeoServer
STDIOMCP server connecting LLMs to GeoServer REST API for geospatial data interactions.
MCP server connecting LLMs to GeoServer REST API for geospatial data interactions.
A Model Context Protocol (MCP) server implementation that connects Large Language Models (LLMs) to the GeoServer REST API, enabling AI assistants to interact with geospatial data and services.
Version 0.4.0 (Alpha) is under active development and will be released shortly. We are open to contributions and welcome developers to join us in building this project.
Choose the installation method that best suits your needs:
To install GeoServer MCP Server for Claude Desktop automatically via Smithery:
npx -y @smithery/cli install @mahdin75/geoserver-mcp --client claude
The Docker installation is the quickest and most isolated way to run the GeoServer MCP server. It's ideal for:
docker pull mahdin75/geoserver-mcp
docker run -d mahdin75/geoserver-mcp
If you are using Claude Desktop, edit claude_desktop_config.json
If you are using Cursor, Create .cursor/mcp.json
{
  "mcpServers": {
    "geoserver-mcp": {
      "command": "docker",
      "args": [
        "run",
        "-i",
        "--rm",
        "-e",
        "GEOSERVER_URL=http://localhost:8080/geoserver",
        "-e",
        "GEOSERVER_USER=admin",
        "-e",
        "GEOSERVER_PASSWORD=geoserver",
        "-p",
        "8080:8080",
        "mahdin75/geoserver-mcp"
      ]
    }
  }
}
The pip installation is recommended for most users who want to run the server directly on their system. This method is best for:
pip install uv
Linux/Mac:
uv venv --python=3.10
Windows PowerShell:
uv venv --python=3.10
uv pip install geoserver-mcp
Linux/Mac:
export GEOSERVER_URL="http://localhost:8080/geoserver"
export GEOSERVER_USER="admin"
export GEOSERVER_PASSWORD="geoserver"
Windows PowerShell:
$env:GEOSERVER_URL="http://localhost:8080/geoserver"
$env:GEOSERVER_USER="admin"
$env:GEOSERVER_PASSWORD="geoserver"
If you are going to use Claude desktop you don't need this step. For cursor or your own custom client you should run the following code.
Linux:
source .venv/bin/activate

geoserver-mcp
or
source .venv/bin/activate

geoserver-mcp --url http://localhost:8080/geoserver --user admin --password geoserver --debug
Windows PowerShell:
.\.venv\Scripts\activate
geoserver-mcp
or
.\.venv\Scripts\activate
geoserver-mcp --url http://localhost:8080/geoserver --user admin --password geoserver --debug
If you are using Claude Desktop, edit claude_desktop_config.json
If you are using Cursor, Create .cursor/mcp.json
Windows:
{
  "mcpServers": {
    "geoserver-mcp": {
      "command": "C:\\path\\to\\geoserver-mcp\\.venv\\Scripts\\geoserver-mcp",
      "args": [
        "--url",
        "http://localhost:8080/geoserver",
        "--user",
        "admin",
        "--password",
        "geoserver"
      ]
    }
  }
}
Linux:
{
  "mcpServers": {
    "geoserver-mcp": {
      "command": "/path/to/geoserver-mcp/.venv/bin/geoserver-mcp",
      "args": [
        "--url",
        "http://localhost:8080/geoserver",
        "--user",
        "admin",
        "--password",
        "geoserver"
      ]
    }
  }
}
The development installation is designed for contributors and developers who want to modify the codebase. This method is suitable for:
pip install uv
uv venv --python=3.10
uv pip install -e .
Linux/Mac:
export GEOSERVER_URL="http://localhost:8080/geoserver"
export GEOSERVER_USER="admin"
export GEOSERVER_PASSWORD="geoserver"
Windows PowerShell:
$env:GEOSERVER_URL="http://localhost:8080/geoserver"
$env:GEOSERVER_USER="admin"
$env:GEOSERVER_PASSWORD="geoserver"
If you are going to use Claude desktop you don't need this step. For cursor or your own custom client you should run the following code.
Linux:
source .venv/bin/activate

geoserver-mcp
or
source .venv/bin/activate

geoserver-mcp --url http://localhost:8080/geoserver --user admin --password geoserver --debug
Windows PowerShell:
.\.venv\Scripts\activate
geoserver-mcp
or
.\.venv\Scripts\activate
geoserver-mcp --url http://localhost:8080/geoserver --user admin --password geoserver --debug
If you are using Claude Desktop, edit claude_desktop_config.json
If you are using Cursor, Create .cursor/mcp.json
Windows:
{
  "mcpServers": {
    "geoserver-mcp": {
      "command": "C:\\path\\to\\geoserver-mcp\\.venv\\Scripts\\geoserver-mcp",
      "args": [
        "--url",
        "http://localhost:8080/geoserver",
        "--user",
        "admin",
        "--password",
        "geoserver"
      ]
    }
  }
}
Linux:
{
  "mcpServers": {
    "geoserver-mcp": {
      "command": "/path/to/geoserver-mcp/.venv/bin/geoserver-mcp",
      "args": [
        "--url",
        "http://localhost:8080/geoserver",
        "--user",
        "admin",
        "--password",
        "geoserver"
      ]
    }
  }
}
| Tool | Description |
|---|---|
list_workspaces | Get available workspaces |
create_workspace | Create a new workspace |
get_layer_info | Get detailed layer metadata |
list_layers | List layers in a workspace |
create_layer | Create a new layer |
delete_resource | Remove resources |
| Tool | Description |
|---|---|
query_features | Execute CQL queries on vector data |
update_features | Modify feature attributes |
delete_features | Remove features based on criteria |
| Tool | Description |
|---|---|
generate_map | Create styled map images |
create_style | Define new SLD styles |
apply_style | Apply existing styles to layers |
If you're planning to develop your own client to interact with the GeoServer MCP server, you can find inspiration in the example client implementation at examples/client.py. This example demonstrates:
The example client serves as a good starting point for understanding the protocol and implementing your own client applications.
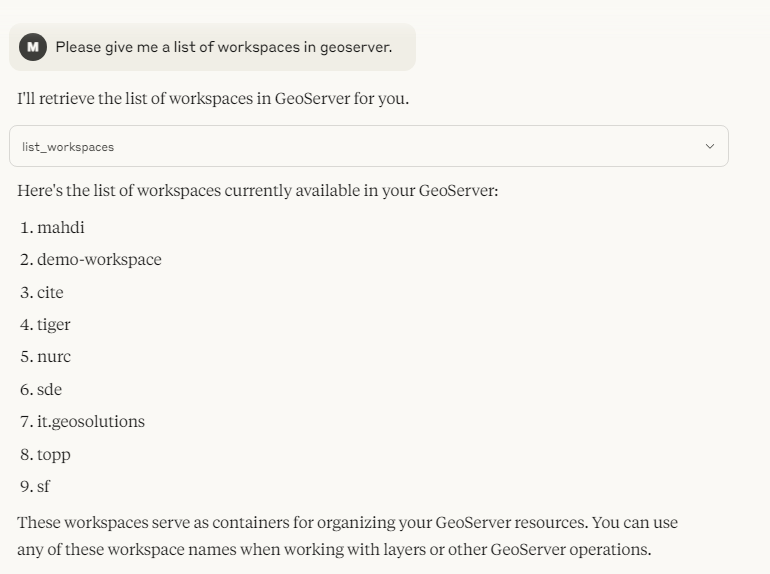
Also, here is the example usgage:
Tool: list_workspaces
Parameters: {}
Response: ["default", "demo", "topp", "tiger", "sf"]
Tool: get_layer_info
Parameters: {
"workspace": "topp",
"layer": "states"
}
Tool: query_features
Parameters: {
"workspace": "topp",
"layer": "states",
"filter": "PERSONS > 10000000",
"properties": ["STATE_NAME", "PERSONS"]
}
Tool: generate_map
Parameters: {
"layers": ["topp:states"],
"styles": ["population"],
"bbox": [-124.73, 24.96, -66.97, 49.37],
"width": 800,
"height": 600,
"format": "png"
}
We welcome contributions! Here's how you can help:
git checkout -b feature/AmazingFeature)git commit -m 'Add some AmazingFeature')git push origin feature/AmazingFeature)Please ensure your PR description clearly describes the problem and solution. Include the relevant issue number if applicable.
This project is licensed under the MIT License - see the LICENSE file for details.
For support, please Open an issue
![]()