
Cortex
STDIOBridge connecting Cortex threat intelligence analyzers to MCP clients like Claude.
Bridge connecting Cortex threat intelligence analyzers to MCP clients like Claude.
This server acts as a bridge, exposing the powerful analysis capabilities of a Cortex instance as tools consumable by Model Context Protocol (MCP) clients, such as large language models like Claude. It allows these clients to leverage Cortex analyzers for threat intelligence tasks.
Cortex is a powerful, free, and open-source observable analysis and active response engine. It allows you to analyze observables (like IPs, URLs, domains, files, etc.) using a variety of "analyzers" – modular pieces of code that connect to external services or perform local analysis.
Benefits of using Cortex (and this MCP server):
This MCP server makes these benefits accessible to MCP-compatible clients, enabling them to request analyses and receive structured results.
AbuseIPDB_1_0, Abuse_Finder_3_0, VirusTotal_Scan_3_1, Urlscan_io_Scan_0_1_0) must be enabled and correctly configured within your Cortex instance.The recommended way to install the MCP Server for Cortex is to download a pre-compiled binary for your operating system.
Go to the Releases Page: Navigate to the GitHub Releases page.
Download the Binary:
Find the latest release and download the appropriate binary for your operating system (e.g., mcp-server-cortex-linux-amd64, mcp-server-cortex-macos-amd64, mcp-server-cortex-windows-amd64.exe).
Place and Prepare the Binary:
/usr/local/bin on Linux/macOS, or a dedicated folder like C:\Program Files\MCP Servers\ on Windows).chmod +x /path/to/your/mcp-server-cortex
PATH if you want to run it without specifying the full path.Alternatively, you can build the server from source (see the Building section below).
The server is configured using the following environment variables:
CORTEX_ENDPOINT: The full URL to your Cortex API.
http://localhost:9000/apiCORTEX_API_KEY: Your API key for authenticating with the Cortex instance.RUST_LOG (Optional): Controls the logging level for the server.
info (for general information)mcp_server_cortex=debug,cortex_client=info (for detailed server logs and info from the cortex client library)For the tools provided by this MCP server to function correctly, the corresponding analyzers must be enabled and properly configured within your Cortex instance. The server relies on these Cortex analyzers to perform the actual analysis tasks.
The tools currently use the following analyzers by default (though these can often be overridden via tool parameters):
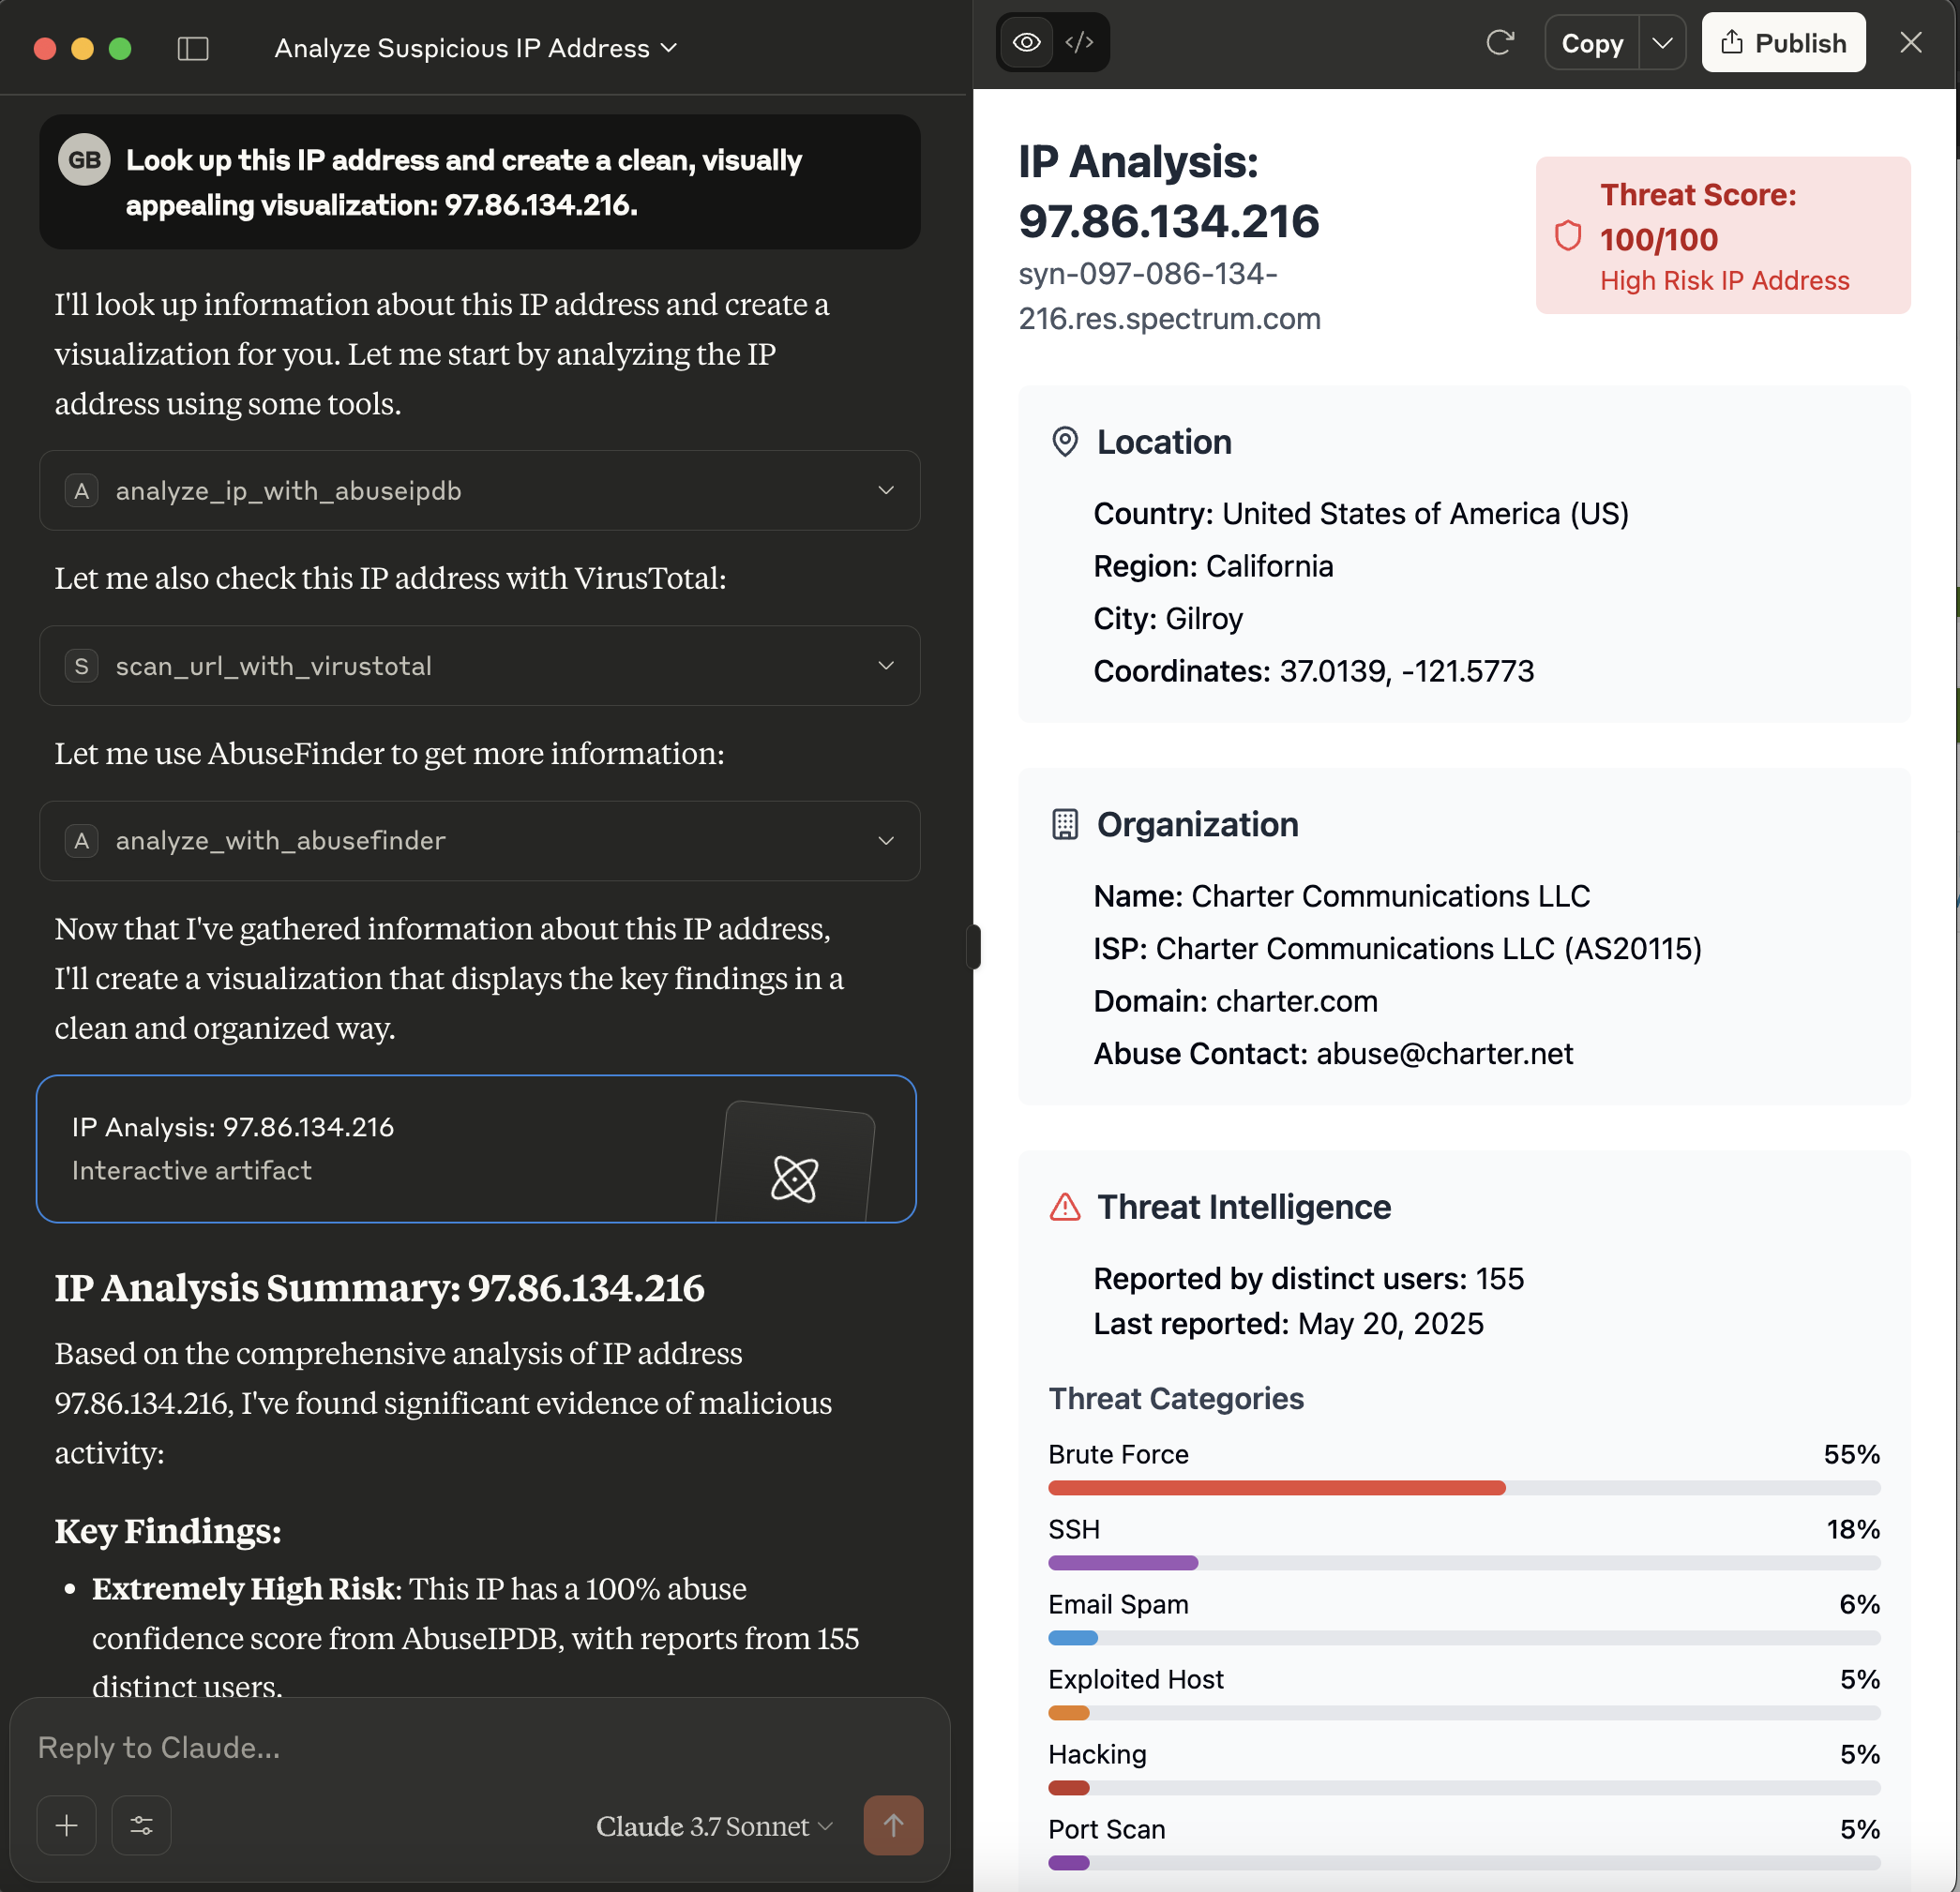
analyze_ip_with_abuseipdb: Uses an analyzer like AbuseIPDB_1_0.
analyze_with_abusefinder: Uses an analyzer like Abuse_Finder_3_0.
scan_url_with_virustotal: Uses an analyzer like VirusTotal_Scan_3_1.
analyze_url_with_urlscan_io: Uses an analyzer like Urlscan_io_Scan_0_1_0.
Key Points:
If an analyzer is not configured, not enabled, or misconfigured (e.g., invalid API key), the corresponding tool call from the MCP client will likely fail or return an error from Cortex.
For MCP clients like Claude Desktop, you typically configure them by specifying the command to launch the MCP server and any necessary environment variables for that server.
Build or Download the Server Binary:
Ensure you have the mcp-server-cortex executable. If you've built it from source, it will be in target/debug/mcp_server_cortex or target/release/mcp_server_cortex.
Configure Your LLM Client (e.g., Claude Desktop):
The method for configuring your LLM client will vary depending on the client itself.
For clients that support MCP, you will typically need to point the client to the path of the mcp-server-cortex executable.
Example for Claude Desktop claude_desktop_config.json:
You would modify your Claude Desktop configuration file (usually claude_desktop_config.json) to include an entry for this server.
For instance, if your mcp-server-cortex binary is located at /opt/mcp-servers/mcp-server-cortex, your configuration might look like this:
{
  "mcpServers": {
    // ... other server configurations ...
    "cortex": {
      "command": "/opt/mcp-servers/mcp-server-cortex",
      "args": [],
      "env": {
        "CORTEX_ENDPOINT": "http://your-cortex-instance:9000/api",
        "CORTEX_API_KEY": "your_cortex_api_key_here",
      }
    }
    // ... other server configurations ...
  }
}
The server provides the following tools, which can be called by an MCP client:
analyze_ip_with_abuseipdb
ip (string, required): The IP address to analyze.analyzer_name (string, optional): The specific name of the AbuseIPDB analyzer instance in Cortex. Defaults to AbuseIPDB_1_0.max_retries (integer, optional): Maximum number of times to poll for the analyzer job to complete. Defaults to 5.analyze_with_abusefinder
data (string, required): The data to analyze (e.g., "1.1.1.1", "example.com", "http://evil.com/malware", "[email protected]").data_type (string, required): The type of the data. Must be one of: ip, domain, fqdn, url, mail.analyzer_name (string, optional): The specific name of the AbuseFinder analyzer instance in Cortex. Defaults to Abuse_Finder_3_0.max_retries (integer, optional): Maximum number of times to poll for the analyzer job to complete. Defaults to 5.scan_url_with_virustotal
VirusTotal_Scan_3_1) via Cortex. Returns the job report if successful.url (string, required): The URL to scan.analyzer_name (string, optional): The specific name of the VirusTotal_Scan analyzer instance in Cortex. Defaults to VirusTotal_Scan_3_1.max_retries (integer, optional): Maximum number of times to poll for the analyzer job to complete. Defaults to 5.analyze_url_with_urlscan_io
Urlscan_io_Scan_0_1_0) via Cortex. Returns the job report if successful.url (string, required): The URL to analyze.analyzer_name (string, optional): The specific name of the Urlscan.io analyzer instance in Cortex. Defaults to Urlscan_io_Scan_0_1_0.max_retries (integer, optional): Maximum number of times to poll for the analyzer job to complete. Defaults to 5.To build the server from source, ensure you have the Rust toolchain installed (as mentioned in the "Prerequisites" section).
Clone the repository (if you haven't already):
git clone https://github.com/gbrigandi/mcp-server-cortex.git
cd mcp-server-cortex
If you are already working within a cloned repository and are in its root directory, you can skip this step.
Build the project using Cargo:
The executable will be located atcargo build
target/debug/mcp-server-cortex.The executable will be located atcargo build --release
target/release/mcp-server-cortex.After building, you can run the server executable. Refer to the "Configuration" section for required environment variables and the "Example: Claude Desktop Configuration" for how an MCP client might launch the server.